So a few weeks ago I picked up an old Eufy robot hoover. It worked out of the box but as someone who has a strong dislike for Tuya products (this specific model was based on a Tuya platform) I had to remove the existing chip inside that gave the robot hoover its smart features.
This specific hoover, I picked up for around 30-40 quid on Facebook marketplace, it doesn’t have any LIDARR sensors, and literally is just a “dumb, bump into everything” type hoover. According to Amazon, it retails currently for £209.99, new. So managed to save a fortune with this one.
Before I go on though, I’d just like to give a shoutout to Rjevski on GitHub who provided a starting point for all of this to come together (https://github.com/Rjevski/esphome-eufy-robovac-g10-hybrid)
Parts:
- Eufy RoboVac (I’ve got a 30C, https://amzn.eu/d/7SMx5y1)
- ESP32 dev board (https://amzn.eu/d/7JQiL8Y)
- Some tools to help with disassembly (Phillips screwdriver, pliers)
- Optional – multi-meter
- Spare time and a bit of patience 😉
Now we’ve established what we need, lets get started.
First things first, we need to pull the hoover apart, I removed absolutely everything from the hoover (including the main logic board) so that I could clean up the insides as the one I had brought needed a good clean up, of course you don’t need to do this though. Below I’ve included a video that shows the disassembly process for the 30C. Follow this until around the 3:30 mark.
Now we’ve opened it up, we need to identify the components of the hoover. The big main board that you immediately see, is the brains of the device itself, it is not the part that actually makes it a smart device and connects up to the Tuya cloud. The part we want to replace seems to vary depending on model, have a hunt around and you should find a separate circuit board with what looks like an ESP chip onboard, the chip itself looks like the below:
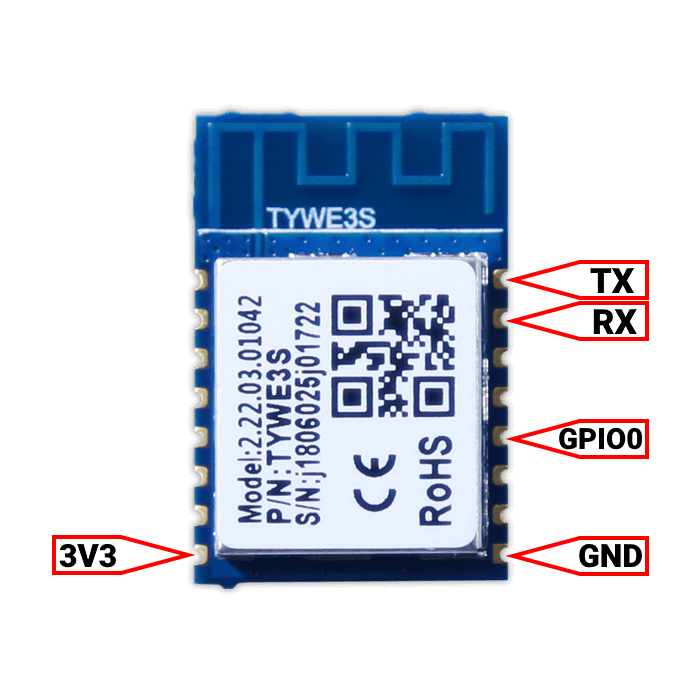
There is a connector with four cables going into it (red, green, blue, black), carefully remove the these cables out of the connector block, leaving with four separate cables.
Now we need to identify power cables. With my model I found that they weren’t using a standard colour scheme (red = +, black = -, blue/black = data). Instead they were slightly different, I would recommend getting the multi-meter out and probing each cable to identify what pair provides 3.3v. Use the GitHub repository above as a starting point.
Once we’ve identified the connectors that provide 3.3v power, hook-up your ESP dev board to your computer and flash ESPHome with a basic config. We can apply the rest of the settings using an OTA update.
This part took me a lot of trial and error to get right, so much so I had to leave it overnight and try again. Hook-up the remaining two cables to GPIO2 and GPIO4, we’ll add a tuya platform configuration to the ESPHome configuration. You need to make sure that you set the logger settings otherwise the connection will fail, and it will also help with figuring out the Tuya datapoints.
The time platform might be optional, but I’ve left it as it is because it works for me.
# Enable logging
logger:
  baud_rate: 0
  level: DEBUG

time:
  - platform: sntp
    id: sntp_time

# UART to talk to the application processor
uart:
  id: vacuum_uart
  rx_pin: GPIO2
  tx_pin: GPIO4
  baud_rate: 115200
  debug: null

# the TuyaMCU object
tuya:
  id: vacuum_tuya
  uart_id: vacuum_uart
  time_id: sntp_time
Compile and install the update config file (you can use OTA at this point as we’ve already installed a basic configuration), wait for the microcontroller to come back online and you should start seeing some logs. At this point you might need to swap GPIO2 and GPIO4 around if you are getting connection errors in the logs.
Once we’ve gotten to this point reassemble the device. Then we can start to create some sensors and buttons (ESPHome doesn’t currently have a vacuum platform, so we will create the actions, switches and sensors needed to create a template vacuum in Home Assistant).
This was a real pain, there isn’t any decent documentation out there at the moment, so below might be very specific to the 30C, although I can’t be sure.
| Datapoint ID | Datapoint Type | Usage | Valid Options |
| 104 | Number (int) | Battery | 0-100 |
| 15 | Select (enum) | Status | 0: Running 1: Idle 2: Sleeping 3: Charging 4: Charged 5: Docking |
| 102 | Select (enum) | Fan Speed | 0: BoostIQ 1: Standard 2: Max 3: Idle |
| 3 | Select (enum) | Move direction* | Unknown |
| 103 | Switch (int) | Locate | |
| 1 | Switch (int) | Unknown* | |
| 2 | Switch (int) | Unknown* | |
| 5 | Select (enum) | Run mode | 0: Auto 2: Spot cleaning 4: Quick clean |
| 101 | bool | Return to dock |
I’m sorry I can’t be anymore specific here, because there are some many variations, not all of this may be correct for your model, although if you read the output of the logs while using the remote to send some commands this may start working.
From here you can then start building the ESPHome config file, as a starting point, for the table above:
sensor:
  - platform: wifi_signal
    name: "WiFi Signal Sensor"
    update_interval: 60s

  - platform: uptime
    name: Uptime Sensor

  - platform: tuya
    name: Battery
    sensor_datapoint: 104
    unit_of_measurement: "%"
    icon: mdi:battery
    device_class: battery
    state_class: measurement
    entity_category: config

select:
  - platform: tuya
    id: status_dp
    enum_datapoint: 15
    options:
      0: Running
      1: Idle
      2: Sleeping
      3: Charging
      4: Charged
      5: Docking
    on_value: &publish_state_sensor
      then:
        - text_sensor.template.publish:
            id: state_sensor
            state: !lambda 'return id(status_dp).state;'

  - platform: tuya
    name: Fan speed
    enum_datapoint: 102
    entity_category: config
    options:
      0: BoostIQ
      1: Standard
      2: Max
      3: Idle

  - platform: tuya
    name: Move Direction
    enum_datapoint: 3
    options:
      0: Direction0
      1: Direction1
      2: Direction2
      3: Direction3


text_sensor:
  - platform: template
    name: State
    entity_category: config
    id: state_sensor

switch:
  - platform: tuya
    name: Locate
    icon: mdi:map-marker
    entity_category: config
    switch_datapoint: 103

  - platform: tuya
    name: Datapoint1
    entity_category: config
    switch_datapoint: 1

  - platform: tuya
    name: Datapoint2
    entity_category: config
    switch_datapoint: 2

button:
  - platform: template
    name: Start cleaning
    entity_category: config
    on_press:
      - lambda: id(vacuum_tuya).force_set_enum_datapoint_value(5, 0);

  - platform: template
    name: Start spot cleaning
    entity_category: config
    on_press:
      - lambda: id(vacuum_tuya).force_set_enum_datapoint_value(5, 2);

  - platform: template
    name: Start quick clean
    entity_category: config
    on_press:
      - lambda: id(vacuum_tuya).force_set_enum_datapoint_value(5, 4);

  - platform: template
    id: return_to_dock
    name: Return to dock
    entity_category: config
    on_press:
      - lambda: id(vacuum_tuya).force_set_boolean_datapoint_value(101, true);
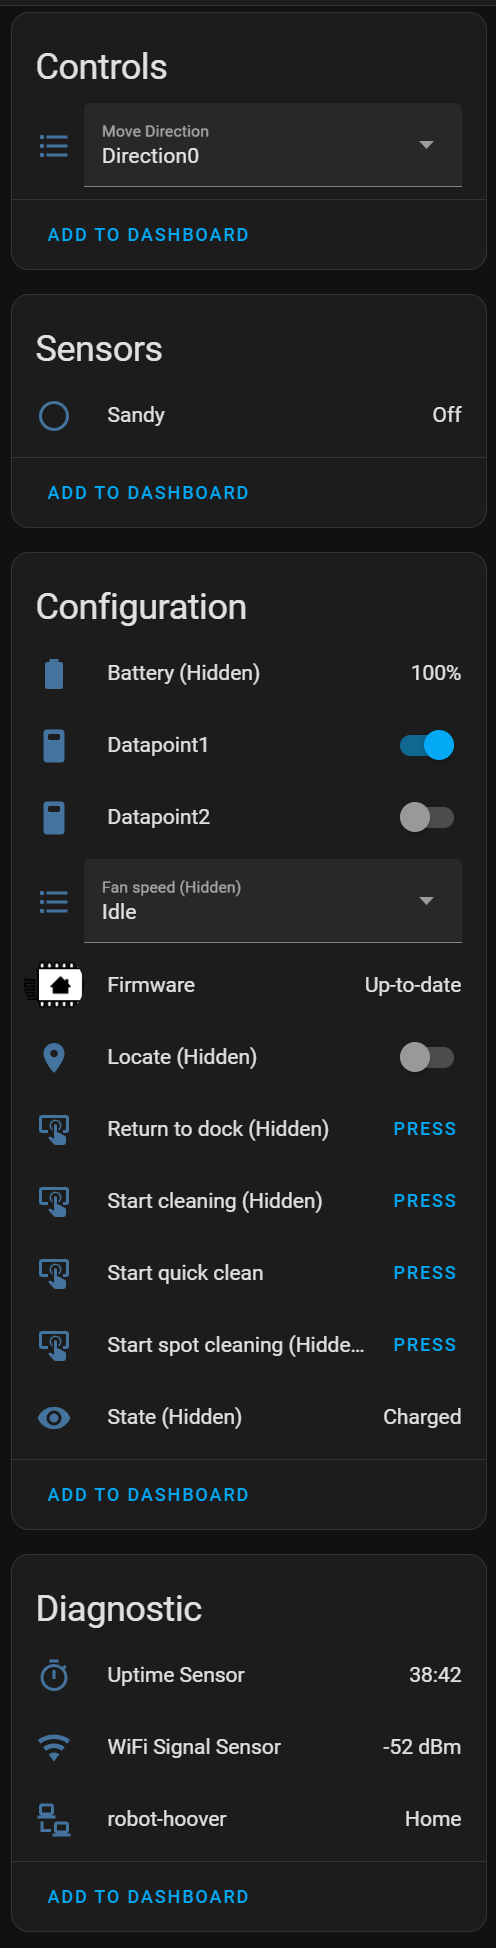
After installing the firmware, you should see some new entities popup in Home Assistant (ignore the sensor, I’m also using the ESP32 in my hoover to track an iBeacon, also lots of entities are hidden here just to tidy things up and keep them out of view)
Now we can create a template vacuum in Home Assistant, this will change depending on your options and setup, but for my setup I’ve used the following:
  - platform: template
    vacuums:
      downstairs:
        friendly_name: Robot Hoover
        unique_id: downstairsrobothoover
        value_template: |
          {% set state_entity = "sensor.robot_hoover_state" %}
          {% if is_state(state_entity, ["Charging", "Charged"]) %}
              docked
          {% elif is_state(state_entity, "Running") %}
              cleaning
          {% elif is_state(state_entity, ["Idle", "Sleeping"]) %}
              idle
          {% elif is_state(state_entity, "Docking") %}
              returning
          {% elif is_state(state_entity, "Paused") %}
              paused
          {% endif %}

        battery_level_template: '{{ states("sensor.robot_hoover_battery") }}'
        fan_speed_template: '{{ states("select.robot_hoover_fan_speed") }}'
        availability_template: '{{ not is_state("sensor.robot_hoover_state", "unavailable") }}'

        fan_speeds:
          - Idle
          - Standard
          - Max
          - BoostIQ

        start:
          - service: button.press
            target:
              entity_id: button.robot_hoover_start_cleaning

        pause:
          - service: switch.turn_off
            target:
              entity_id: switch.robot_hoover_datapoint2

        return_to_base:
          - service: button.press
            target:
              entity_id: button.robot_hoover_return_to_dock

        clean_spot:
          - service: button.press
            target:
              entity_id: button.robot_hoover_start_spot_cleaning

        locate:
          - service: switch.turn_on
            target:
              entity_id: switch.robot_hoover_locate
          - delay: 1
          - service: switch.turn_off
            target:
              entity_id: switch.robot_hoover_locate

        set_fan_speed:
          - service: select.select_option
            target:
              entity_id: select.robot_hoover_fan_speed
            data:
              option: "{{ fan_speed }}"